Forward: For anything that ever gets posted on this site as a tutorial or project series that calls out materials and/or tools that are not free to follow along on your own, please assess your continued personal interest in the subject matter before committing to a purchase, especially if the considered item is more specialized than general purpose. Feel free to continue reading the posted materials to gauge interest.
That being said, a computer has many uses by many people. If you were to buy a computer to check out programming tutorials online, it could just as well be used for many other non-programming tasks.
Now, if you already have a capable computer that you have full ownership or authorization for use/configuration, just use that. The best things are those that you already have.
So, doesn’t that include everyone? This is 2016, not 1996. Well, not quite: Even though affordability has improved vastly over the years, it can still be a stretch to obtain a computer. But even for those who are more than able to afford a computer, with many personal computing needs being met with smartphones and tablets, a lot of folks can forgo a computer in the home.
That is, until you want do things outside of email, “liking” your friends, and taking selfies with food.
Computers of the desktop and laptop variants are on the market at many price points and feature-sets, and I am to believe folks are more than capable of finding one that best fits their needs. Any attempt of writing out a buying-guide would be wasted efforts on my part, as many review sites already fill that role.
But I’ll focus on “hi-value, low-cost” for a moment. If someone who didn’t already own a computer (and access to a work provided machine doesn’t count…), I would suggest spending the least possible if their only driving interest in owning a computer is to follow along posted examples on my site. But I’d still want to propose a system that’s decently built with reasonable specifications.
Enter: The Chromebook.
A category of low-cost (except for the Chromebook Pixel) hardware running Google’s Chrome OS, plenty for most casual computer users, many models with battery specs that rival that of big-box door-buster traditional laptop models. Base system storage is eMMC, and while typically relatively small (16, sometimes 32GB), is usually augmented by an available SD/microSD card slot, thereby presenting a fully solid-state system. Most Chromebooks are equipped with 2 USB slots, and some form of video output (e.g. HDMI).
Browsing available models, thin and light is a common theme, making them pack and go anywhere.
Chromebook (and ChromeOS) is commonly positioned as an internet-reliant thin-client of sorts: It’s easy to summarize the intent of a Chromebook as a Chrome Browser as a computer system, with “applications” in the form of Chrome Apps and Extensions. –and for email, general browsing, office productivity (via Google Docs), VOIP (Hangouts), and light photo editing, its quite a sufficient setup.
However, by following some well documented steps, a Chromebook can be easily enabled as a stealth economy Ultrabook alternative:
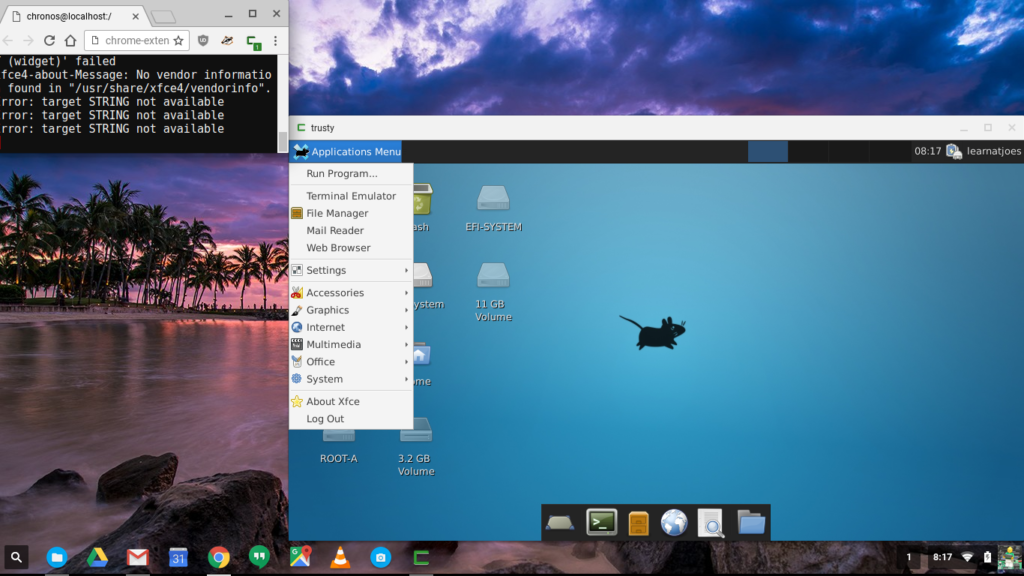
Yes, I am a recently new owner of a Chromebook that runs an Ubuntu Linux system within a window. Running Linux opens access to all software (within CPU and storage reasons) on the Linux platform to my $200 econo-laptop that seems to have no problem returning 11 hours unplugged life under more pedestrian uses.
I further detail what I did to get the screen capture above in this HowTo, but in summary it was:
- Unbox and verify machine works out of the box. Allow system to update.
- Backup The System, just in case…
- Enable Developer Mode
- Use Crouton to automagically download and install Linux in a chroot.
Tip: Using a large SD card split between “local storage” and “Linux” helps keep the limited eMMC block dedicated for ChromeOS.
New-purchase prices for Chromebooks tend to range between just below $100 to maybe $400 on the higher end, with the Pixel on the other side of $1k. In the 2-3 US Benjamins section, distinguishing specs are screen size, CPU type, and RAM. Look for:
- Screen size: 11.6″ is great for ultra portability, 14″ or 15″ can be had with 1080p resolution.
- Small convertible models are nice if you want to stay on from gate to gate while flying domestically in the US.
- I’d strongly recommend an Intel based CPU (e.g. Celeron). ARM is fine for ChromeOS, but may present some hurdles with Linux applications since most are written for x86.
- Strong preference for fanless design. One less thing to fail or draw milliwatts from the battery, and less concern for internal dust accumulation.
- More RAM is better if available. For most models, its not user up-gradable so you’ll have to choose when you buy.
- Larger eMMC is nice-to-have, but ChromeOS itself keeps a small footprint on its own. Make sure your model is equipped with a SD or microSD card slot.
The system I’m staging as a sample software development platform (and using to update this page…) was obtained for $200. It comes with a matte, anti-glare 11.6″ screen, 4GB RAM, 11hrs quoted battery life and has a $40 128GB microSD card loaded.
A value that’s pretty hard to beat for a tad under $250.
Happy Computing!
Further Reading: