The state of EV efficiency (2023)
Electric Vehicles (EV) are quite the discussion topic today, yeah? Pretty neat stuff, you get an electric motor(s), some number of batteries and go for some distance. Our society and economy functions on access to transportation and ability of people to get to where they need/want to go. Some folks call this ‘transit’. We also care about energy concerns including sourcing, cost-of-use, sustainability, and stewardship of energy, so by extension we should care about transportation efficiency.
EV Range, Capacity, Efficiency Data
Rather than solely relying on manufacturer quoted spec’s, lets dive into some data provided by third-party reviewers. Listed sources’ “independence” will be left to the determination of the reader, but for the scope of this post we can consider the values reported as reasonably appropriate, as this is a small sampling of not only private “car” vehicles but also considers micromobility options like eScooters and eBikes as they are also both “electric” and “vehicular” by definition.
| EV Make/Model | Tested Range (mi) | Battery Capacity (kWh) | Miles Per kWh | Remarks |
|---|---|---|---|---|
| Ford F-150 Lightning Platinum | 230 | 131 | 1.76 | |
| Volkswagen ID4 | 190 | 77 | 2.47 | |
| Chevrolet Bolt EV | 278 | 65 | 4.28 | |
| Tesla Model 3 (base) | 261 | 58 | 4.50 | |
| Drive Medical Spitfire Scout 3-wheel | 9 | 0.576 | 15.63 | Likely Mfg quoted range |
| RadRover 6 PAS 5 | 28.47 | 0.672 | 42.37 | |
| Aventon Pace 500 PAS 5 | 27.88 | 0.6144 | 45.38 | |
| Hiboy S2 | 12.7 | 0.270 | 47.04 | |
| GoTrax XR Ultra | 12 | 0.252 | 47.62 | |
| Lectric XPremium PAS 5 | 50 | 0.9984 | 50.08 | |
| Urban Arrow Family | 31 | 0.500 | 62.00 | Reported long-term average |
| Trek Allant+ 7 max PAS | 30 | 0.4824 | 62.19 | |
| REI Co-op Generation e1.1 PAS 5 | 35.84 | 0.4176 | 85.82 |
PAS = “Pedal Assist” level. Typically quoted as PAS 1-5 with 5 (or “Turbo”) being highest electric motor assist input into eBike drivetrain.
We’ll visualize the efficiency data with a spreadsheet generated chart:
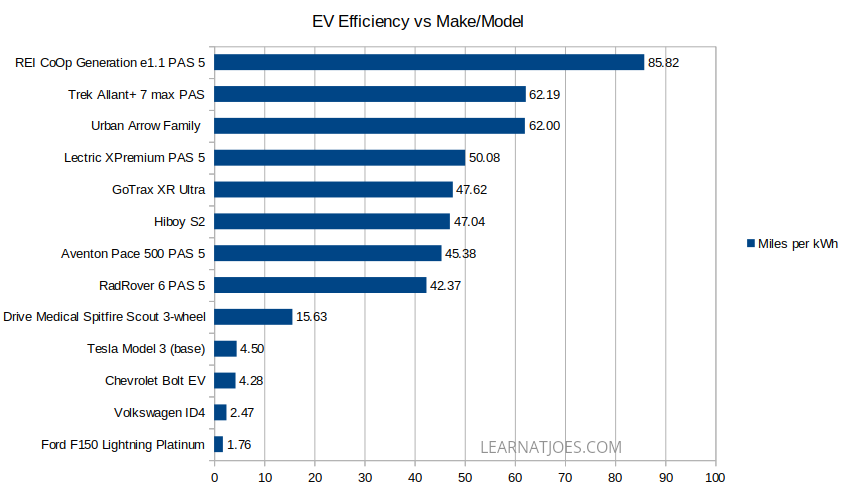
Key Observations
A Childish Omission: I could not locate much (or any…) data on per-charge range for stock/unmodded Powerwheels Jeep EVs.
Mobility for all: When we’re talking about transit and looking beyond car dependency, we have to include folks who do not have access to private car use and might not be physically able to stand or pedal for periods of time. So while mobility scooters aren’t usually brought up alongside eScooters and eBikes, I included a sample above for reference. Though, the Spitfire Scout’s quoted 4.25 MPH is about as fast as a Powerwheels on “High”. Its also the only vehicle listed that uses a 12v lead acid battery and takes 8-12hrs to charge. Seeing that my kid’s eScooter travels twice as fast over the same distance with 1/6 the battery capacity and 1/3 the cost of the Spitfire Scout with a 2hr recharge time to boot, there’s definitely some market disruption opportunity here. However hopefully it’d be a short lived window if more folks get into less sedentary lifestyles, therefore decreasing market demand for mobility scooters.
How much investment for how much return?: While the Tesla is a bit of a halo model in the car space, all things considered from a $579 billion market cap company with so much engineering resources to get so many things working together correctly, its a bit baffling that even they can’t get better than 1/3 the per-kWh efficiency of a mobility scooter for a car. –I’m sure physics plays at minimum a small limiting role.
There’s nothing micro about micromobility efficiency. When it comes to getting you to the grocery store down a few blocks and returning with a few grocery bags, or fetching the next book in the manga series from the library, the distance/energy value from an eBike or eScooter is order of magnitude better than an EV car.
Other Takes:
The eScooter data points (HiBoy S2, GoTrax XR Ultra) are just as efficient as many of the sampled eBikes on the list. That’s a bit surprising to me as I had thought eScooters would be at a by-design efficiency disadvantage from mostly exclusive electric drive propulsion as opposed to eBike electronic assist. OTOH, eScooter total ranges are usually much less than eBikes due to limited chassis real estate for battery cells.
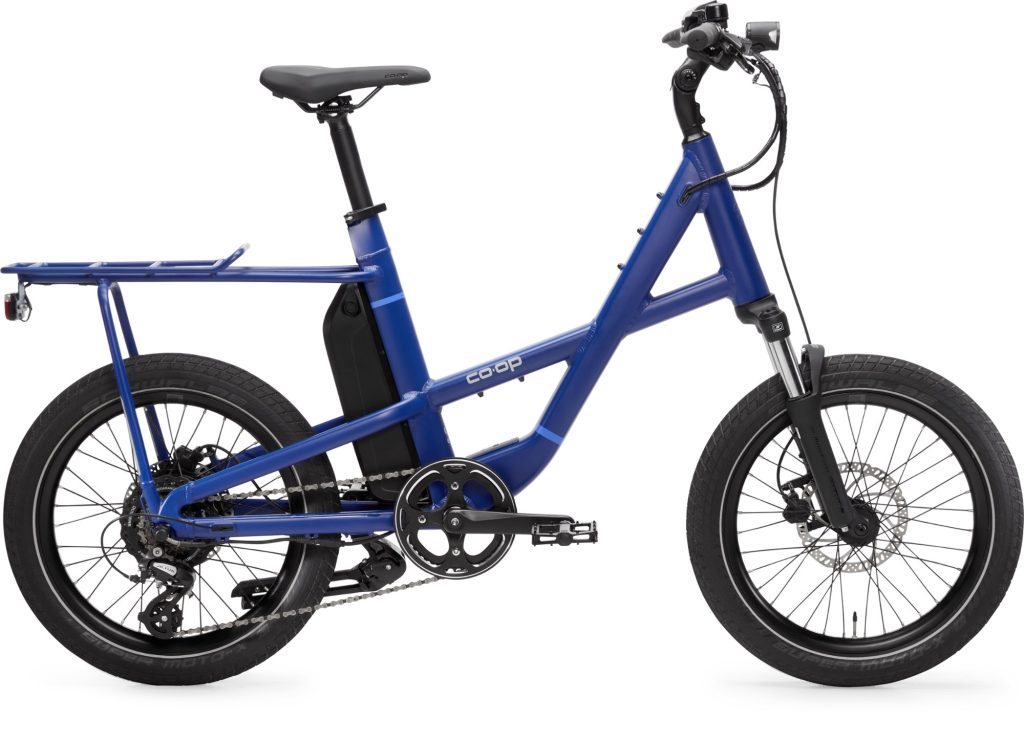
The Front Box Cargo eBike is an unexpected lead in miles/kWh. For those unfamiliar, the Urban Arrow Family is what you’d get if you split the Trek Allant put a high capacity wheelbarrow between the front and rear halves. And hauls cargo it does indeed:

The Recreational Equipment experts really like us being outdoors at affordable cost. Conventional eBike wisdom suggests that hub motor electronic drive-trains are less efficient than mid-drive systems, and that is mostly supported by the data above. (The XPremium, Family and Allant+ are mid-drive). REI Co-op demonstrates with their Bafang hub-motor based Generation e1.1 that system integration design is crucial.
Your actual eBike range will likely exceed that data presented.
- I purposely selected data samples from highest pedal assist to get towards a minimum expected range. Most folks will typically ride comfortably at one of the lower PAS levels as the bike’s likely fast enough with some rider leg input.
- The range tests from most of the listed resources seem to run the bike on a test circuit with a static load from beginning to end. While you might return home from the grocery store with 30 lbs of food, the bike is normally only carrying you and a few reusable canvas bags out to the grocery store.
A possible caveat on the data: The tested ranges were done at each vehicle types’ typical operating speeds. So, it is possible that the Tesla Model 3’s efficiency is actually better if ran at 15 MPH. However, to match the efficiency of the least efficient eBike listed, the Model 3 would have to manage 2300+ miles out of a single charge. (40 miles/kWh * 58 kWh)
On Battery Resourcing and Allocation
Battery mining often comes up on EV discussions, as there’s only so much readily accessible and cost-effective minerals to get. Consideration into where the sourced energy storage blocks be placed should be given.
Here’s what 0.5 kWh of battery looks like:
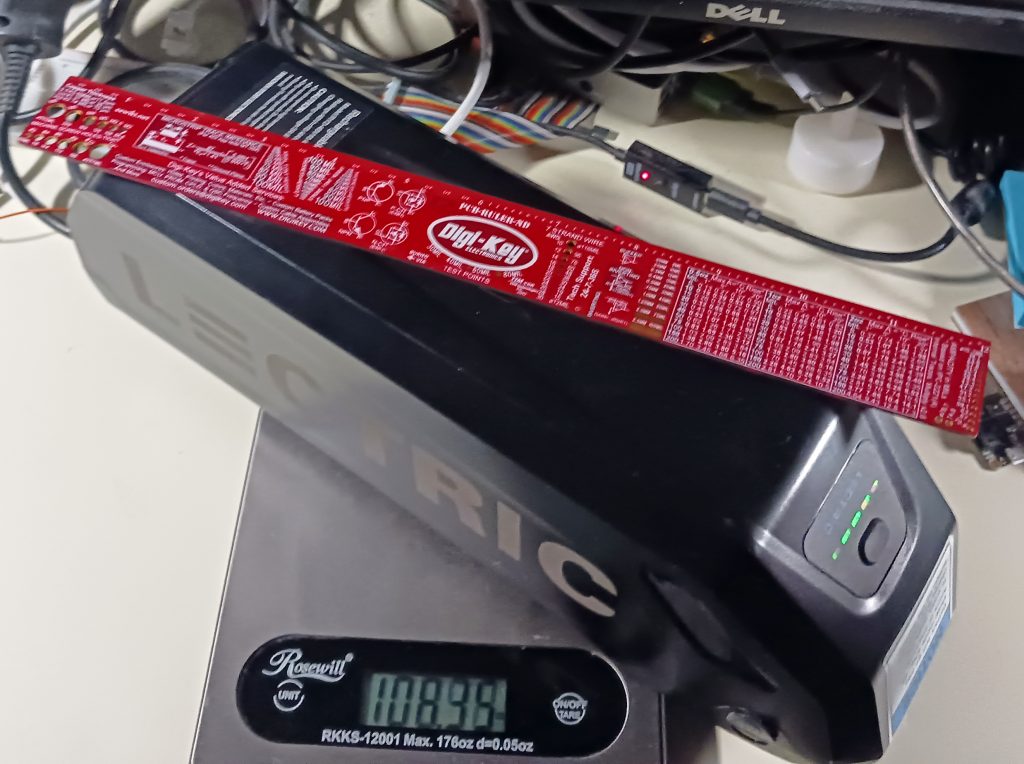
The various electronic bike component makers will tweak capacity and shape to fit their frame integration and power delivery targets, but for the most part volume is volume for equivalent battery chemistry and topology.
Ignoring packaging and such, it’d take ~130 of these blocks to fill the capacity of a Chevy Bolt to enable one 1-5 people to get around town. That same 130 packs could power 130 moderately priced e-Bikes to move 130 people around town, or they could be split into 260 “half-packs” to get 260 people scooting around.
Kill the car you say? Well, no. We USA residents need to occasionally get between towns not connected by reliable mass transit. A fully electrified transportation household of 4 might own 130 or so blocks for the family car + 1 per person for local micromobilty vehicles.
Putting in 2x Chevy Volt or 260+ bike battery blocks into a F-150 Lightning? Technically yes, the EV powered truck is lower cost to operate than the gasoline model. But the few truck owners I know use their trucks to get out into remote wilderness for hunting/recreation for days at a time, or out into undeveloped spaces to build them into developed spaces. If they want/need high capacity 120 or 240 VAC power, they have to pack a generator with operating fuel for them. The tested 230 miles “tank range” seems low even for pickup truck standards, and its dead last on electric efficiency. A survey of 260 would-be bike riders or 520 would-be scooter riders might likely support that F-150 being fossil fueled for doing truck things if the EV industry has to decide where to deploy battery cells.
What are we supporting/subsidizing and for what reasons?
You don’t have to spend hours watching YouTube content to start wondering if public policy actions match their claimed purposes. I just did one small analysis here, you and others are welcome to perform the same study or other evaluations. Some closing thoughts to ponder upon:
- Which is more effective at reducing gasoline car use? A Car EV tax credit or an eBike rebate?
- Reduces which car use? Local in town, or between cities? Which mode is more often used? Which mode is more detrimental to air quality and other environmental concerns?
- Are there alternative examples in the world that don’t require households to finance, register, and insure a private car vehicle “just to get to work”?
- What do those options costs us compared to expanding our existing car-first infrastructure and EV charging network?
- If you are an able bodied person yet “need” to use a 4 wheel EV car of 2-4 miles/kWh to get 2 miles to the grocery store….Why is that so? Who made those decisions?
- …and so on.
Data References
- https://www.caranddriver.com/ford/f-150-lightning
- https://www.caranddriver.com/volkswagen/id4
- https://www.edmunds.com/chevrolet/bolt-ev/
- https://www.edmunds.com/tesla/model-3/
- https://www.mobilityonwheels.com/product/drive-medical-spitfire-scout-3-wheel/
- https://electricbikereport.com/rad-power-bikes-radrover-6-review/
- https://electricbikereport.com/aventon-pace-500-step-through-review/
- https://electric-scooter.guide/reviews/hiboy-s2-review/
- https://electrek.co/2020/02/25/gotrax-xr-ultra-review-cheapest-electric-scooter/
- https://electricbikereport.com/lectric-xpremium-review/
- https://www.cyclingtips.com/2022/02/urban-arrow-family-cargo-bike-long-term-review-a-pickup-truck-on-two-wheels/
- https://electricbikereview.com/trek/allant-plus-7/
- https://electricbikereport.com/rei-co-op-cycles-generation-e11-review/