Browsed by
Month: July 2016

Fundamental Basics: Numerical Systems

Fundamental Basics: Numerical Systems

There’s an old joke: “There are only 10 types of people in the world: those who understand binary, and those who don’t.”  If you don’t get it now, hopefully you will after this post.

For most everyday tasks, we’ve been accustomed to using base-10, or “decimal” numerical system.  Its what we’re taught from grade school and makes the most logical sense for humans.  A quick recap on integer base-10 goes back to “ones”, “tens”, “hundreds”, and we say digits go from 0-9.

Let’s take a sample number 325.  We say 325 is comprised of (3*100) + (2*10) + (5*1):

 |--100's
 ||---10's
 |||----1's
 325 

Or, an equivalent way of notation is:

 |--10^2
 ||---10^1
 |||----10^0
 325

..in case you’ve forgotten algebra, I’ve linked Google Calculator above.  For each number column, the digit represents that many 10^x.  Like, 3 in the “hundreds column” is so because 10^2 is 100, and there’s 3 of them.

It’s called base-10, because the base number is 10.

In Binary, the base number is 2, a.k.a. base-2.  In base-2, the digits go from 0-1, and each column is 2^x.  So, if we take binary “1011”:

|---2^3
||----2^2
|||-----2^1
||||------2^0
1011

Reading the binary digits left to right, there’s 1 of (2^3) + 0 of (2^2) +1 of (2^1) + 1 of (2^0), OR (1*8) + (0*4) + (1*2) + (1*1) = 11 decimal.

While human brains process and store numbers in base-10, computer systems store data in binary, hence our discussion as a fundamental concept for software and embedded systems.

In nomenclature, each binary digit is called a “bit”.  (binary 1011 is a 4 bit number).  Data variables and CPU architectures are often referred to as number of bits.  A 8-bit processor indicates that it natively processes data in 8-bit wide registers.  A 16 bit data variable means it can hold up to 16 bits for that variable.

|-2^15
||--2^14
||        ...
||               |--2^1
||               ||---2^0
1010 1100 0011 1011

Writing out just 16 bits already starts to look like writing out credit card numbers.  Imagine how long and tedious it gets to write out/read 32 bits, 64…

Luckily, there’s another numerical format: Hexadecimal, or “Hex”.  Hex is base-16.  There’s 16 digits.  The first ten digits are 0-9.  To avoid ambiguity, the eleventh through sixteenth digits are denoted A-F, so while binary digits go [0, 1] and decimal digits go [0, 1, 2, 3, 4, 5, 6, 7, 8, 9], hex digits go [0, 1, 2, 3, 4, 5, 6, 7, 8, 9, A, B, C, D, E, F].

Perhaps a table will help:

|decimal | binary | hex |
|--------|--------|-----|
|      0 |  0000  |   0 |
|      1 |  0001  |   1 |
|      2 |  0010  |   2 |
|      3 |  0011  |   3 |
|      4 |  0100  |   4 |
|      5 |  0101  |   5 |
|      6 |  0110  |   6 |
|      7 |  0111  |   7 |
|      8 |  1000  |   8 |
|      9 |  1001  |   9 |
|     10 |  1010  |   A |
|     11 |  1011  |   B |
|     12 |  1100  |   C |
|     13 |  1101  |   D |
|     14 |  1110  |   E |
|     15 |  1111  |   F |
|--------|--------|-----|

From the table, each hex digit can be represented by a 4-bit binary value.  That’s convenient in that you can group a binary representation into 4-bits and convert it to hex:

binary: 1010 1100 0011 1011
hex:       A    C    3    B

The binary value 1010110000111011 (commonly written as 0b1010110000111011 or 1010110000111011b) is equivalent to hex value AC3B (commonly written as 0xAC3B, or AC3Bh)

To convert to decimal, the value 0xAC3B can be viewed as:

|---16^3
||----16^2
|||-----16^1
||||------16^0
AC3B

where the number has

("A" *16^3) + ("C" *16^2) + (3 *16^1) + ("B" *16^0), or 
(10  *4096) + (12  * 256) + (3 *  16) + (11  *   1)  == 44091 dec.

As with base-10 math, there are calculators available that aid in converting numerical representation.

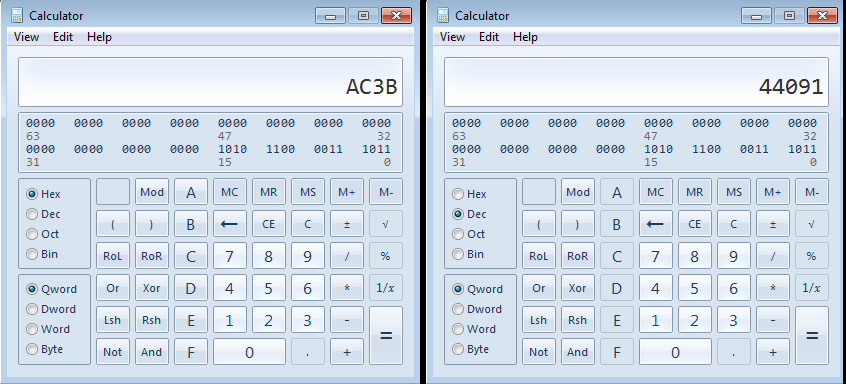
On Windows, the “calc.exe” in programmer mode (View->Programmer) is handy:

calc

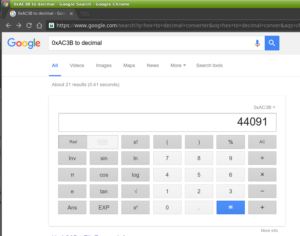
You can also try the Google:

Screenshot - 07222016 - 10:39:37 PM Screenshot - 07222016 - 10:40:06 PM Screenshot - 07222016 - 10:40:21 PM

As a building block in software and embedded systems development, having a working knowledge of these three numerical systems are a prerequisite.  There is another format, Octal, that’s base-8, that is usually also introduced in Computer Science.  I think after going through binary and hex it isn’t to hard to figure out.
 

Getting Started: A Hi-Value, Low-Budget Laptop Option

Getting Started: A Hi-Value, Low-Budget Laptop Option

Forward: For anything that ever gets posted on this site as a tutorial or project series that calls out materials and/or tools that are not free to follow along on your own, please assess your continued personal interest in the subject matter before committing to a purchase, especially if the considered item is more specialized than general purpose.  Feel free to continue reading the posted materials to gauge interest.

That being said, a computer has many uses by many people.  If you were to buy a computer to check out programming tutorials online, it could just as well be used for many other non-programming tasks.

Now, if you already have a capable computer that you have full ownership or authorization for use/configuration, just use that.  The best things are those that you already have.

So, doesn’t that include everyone?  This is 2016, not 1996.  Well, not quite: Even though affordability has improved vastly over the years, it can still be a stretch to obtain a computer.  But even for those who are more than able to afford a computer, with many personal computing needs being met with smartphones and tablets, a lot of folks can forgo a computer in the home.

That is, until you want do things outside of email, “liking” your friends, and taking selfies with food.

Computers of the desktop and laptop variants are on the market at many price points and feature-sets, and I am to believe folks are more than capable of finding one that best fits their needs.  Any attempt of writing out a buying-guide would be wasted efforts on my part, as many review sites already fill that role.

But I’ll focus on “hi-value, low-cost” for a moment.  If someone who didn’t already own a computer (and access to a work provided machine doesn’t count…), I would suggest spending the least possible if their only driving interest in owning a computer is to follow along posted examples on my site.  But I’d still want to propose a system that’s decently built with reasonable specifications.

Enter: The Chromebook.

Screenshot - 07182016 - 10:14:56 PM

A category of low-cost (except for the Chromebook Pixel) hardware running Google’s Chrome OS, plenty for most casual computer users, many models with battery specs that rival that of big-box door-buster traditional laptop models.  Base system storage is eMMC, and while typically relatively small (16, sometimes 32GB), is usually augmented by an available SD/microSD card slot, thereby presenting a fully solid-state system.  Most Chromebooks are equipped with 2 USB slots, and some form of video output (e.g. HDMI).

Browsing available models, thin and light is a common theme, making them pack and go anywhere.

Chromebook (and ChromeOS) is commonly positioned as an internet-reliant thin-client of sorts: It’s easy to summarize the intent of a Chromebook as a Chrome Browser as a computer system, with “applications” in the form of Chrome Apps and Extensions.  –and for email, general browsing, office productivity (via Google Docs), VOIP (Hangouts), and light photo editing, its quite a sufficient setup.

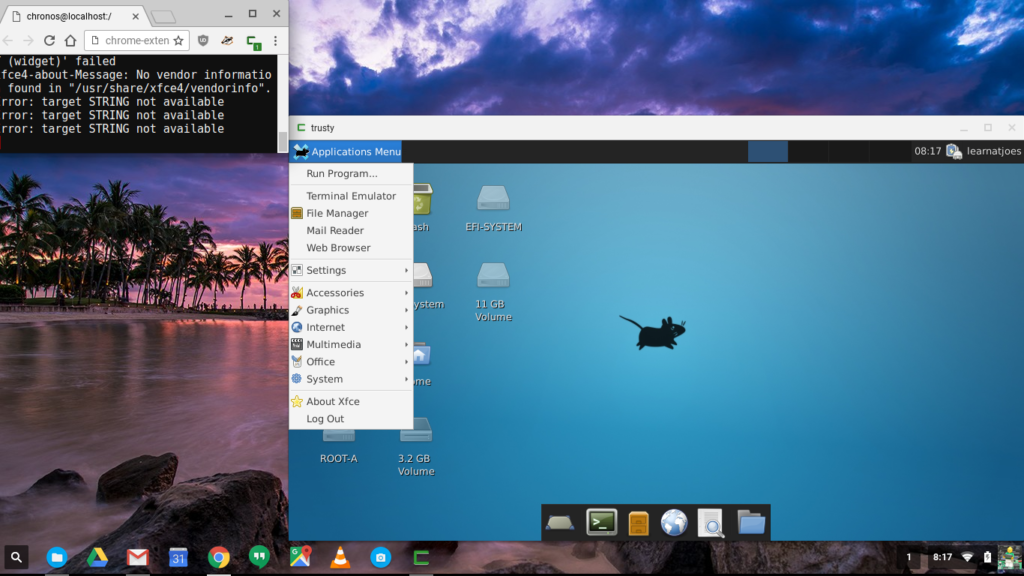
However, by following some well documented steps, a Chromebook can be easily enabled as a stealth economy Ultrabook alternative:

Screenshot 2016-07-18 at 8.17.56 AM

Yes, I am a recently new owner of a Chromebook that runs an Ubuntu Linux system within a window.  Running Linux opens access to all software (within CPU and storage reasons) on the Linux platform to my $200 econo-laptop that seems to have no problem returning 11 hours unplugged life under more pedestrian uses.

I further detail what I did to get the screen capture above in this HowTo, but in summary it was:

  1. Unbox and verify machine works out of the box.  Allow system to update.
  2. Backup The System, just in case…
  3. Enable Developer Mode
  4. Use Crouton to automagically download and install Linux in a chroot.

Tip: Using a large SD card split between “local storage” and “Linux” helps keep the limited eMMC block dedicated for ChromeOS.

New-purchase prices for Chromebooks tend to range between just below $100 to maybe $400 on the higher end, with the Pixel on the other side of $1k.  In the 2-3 US Benjamins section, distinguishing specs are screen size, CPU type, and RAM.  Look for:

  • Screen size: 11.6″ is great for ultra portability, 14″ or 15″ can be had with 1080p resolution.
  • Small convertible models are nice if you want to stay on from gate to gate while flying domestically in the US.
  • I’d strongly recommend an Intel based CPU (e.g. Celeron).  ARM is fine for ChromeOS, but may present some hurdles with Linux applications since most are written for x86.
  • Strong preference for fanless design.  One less thing to fail or draw milliwatts from the battery, and less concern for internal dust accumulation.
  • More RAM is better if available.  For most models, its not user up-gradable so you’ll have to choose when you buy.
  • Larger eMMC is nice-to-have, but ChromeOS itself keeps a small footprint on its own.  Make sure your model is equipped with a SD or microSD card slot.

The system I’m staging as a sample software development platform (and using to update this page…) was obtained for $200.  It comes with a matte, anti-glare 11.6″ screen, 4GB RAM, 11hrs quoted battery life and has a $40 128GB microSD card loaded.

A value that’s pretty hard to beat for a tad under $250.

Happy Computing!

Further Reading:


Fundamental Basics: Ohm’s Law

Fundamental Basics: Ohm’s Law

If you can remember V=IR after reading this post, you’ve started building a foundational understanding of electronics.

Without getting deep into theory, history, and discovery, we can summarize that is Ohm’s Law is V=IR, or

Voltage = (current_I) * (resistance_R)

But Joe, what is Voltage, Current, and Resistance, explained to someone without a engineering degree?

  • If you recall “potential energy” from elementary grade school science, Voltage defines the electrical potential energy.  A typical AAA/AA/C/D battery stores about 1.5 Volts (V) of energy.
  • You also probably have an understanding of electrons from grade school science.  Electrical Current refers to the flow of electric charge, carried by moving electrons.  If you’ve ever had to jump start a car, the transfer of energy from the “good” battery to the “dead” battery is via current.  Current is measured in units of Amps (A).
  • Resistance describes the difficulty of which electrical current passes though.  Resistance is measured in Ohms, typically denoted by (Ω)

These are quite simplified explanations that likely leave out a lot of details, but ideally provide enough information to get going.  In the goal of reaching to the widest range of audience, the intent of this blog is to go over enough information to become actionable but point to resources for additional study if desired by the reader.

Ohm’s in the home!

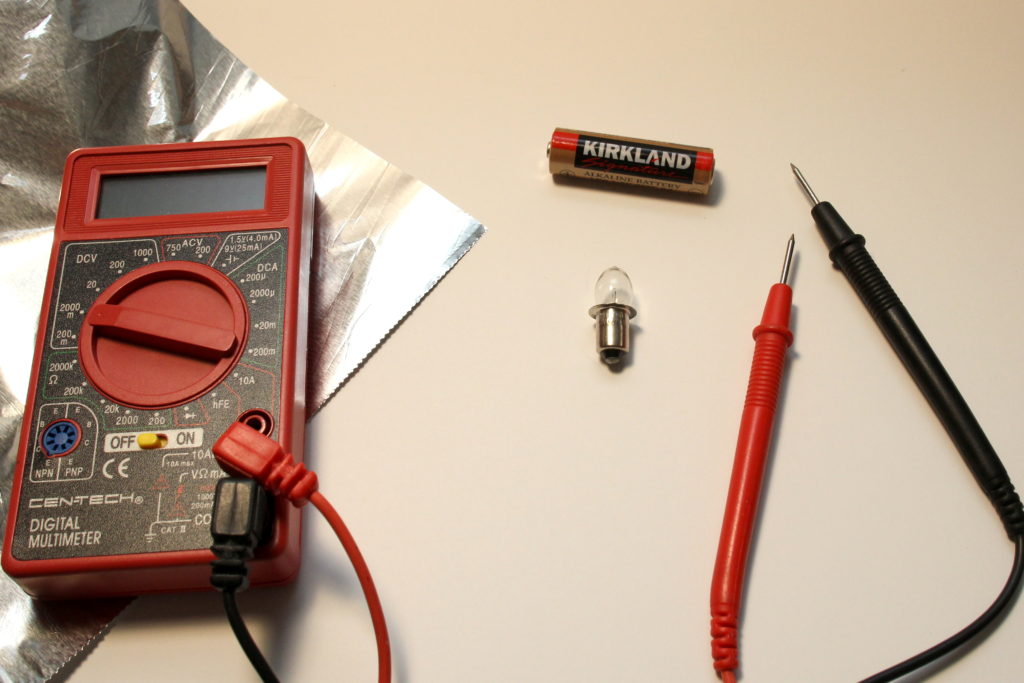
Find (or obtain the following):
IMG_0199ce

  • A non-LED flashlight bulb.  If you don’t have one lying around in a miscellaneous drawer, locate a dollar-store or dollar-bin flashlight.
  • 1 AA battery.
  • Conductive material.  This is fancy talk for “wire”.  If you don’t have wire, get some aluminum foil.
  • Multimeter.  We will be measuring resistance, voltage, and current.  There might be one in a garage or toolbox.  Otherwise, you can find value-priced unit from a Big Box store.  Or bring in a “Super Coupon” to a nearby Harbor Freight and pick one up for free to almost free.

First, check that the flashlight bulb works with the AA battery.  We want to make sure the bulb a) is not burned out, and b) can light up with 1 battery.  You can do this by placing the butt of the bulb on the (+) side of the battery, and connecting the outer shell of the bulb to the (-) of the battery.  Usage of “unidirectional bonding strip” is optional: I’m mainly using tape just to hold things down to take the pictures.

Non-insulated conductor is generally frowned upon, but this is really low voltage/current so we're ok here for now.
Non-insulated conductor is generally frowned upon, but this is really low voltage/current so we’re ok here for now.

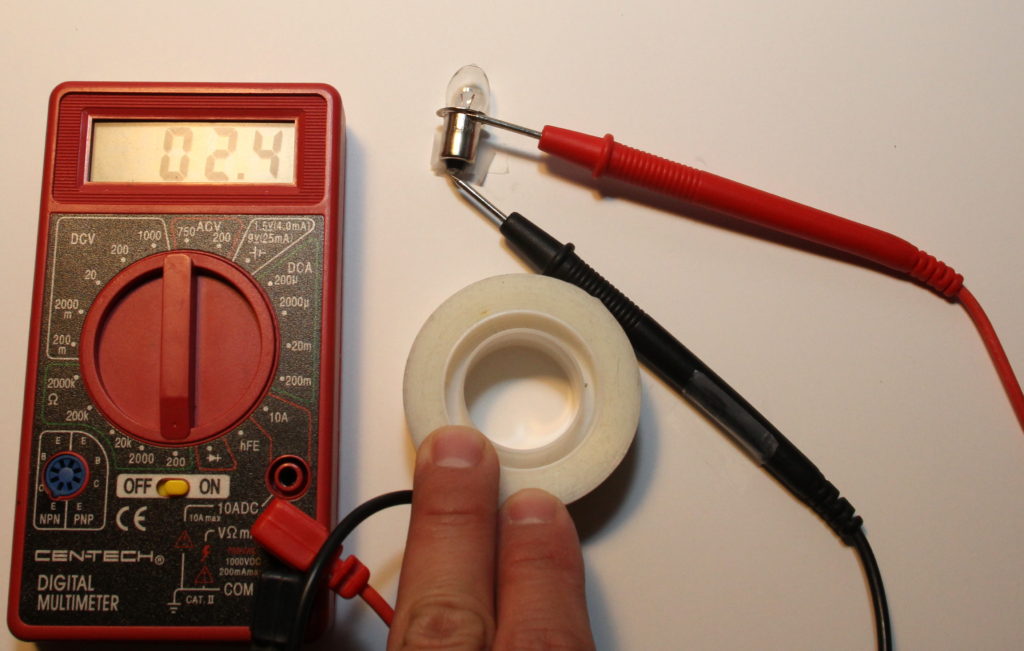
Now, we want to try to measure the resistance of the light bulb.  Put your multimeter in resistance mode (look for the Ω).  Plug in the black probe to the “COM” socket of the meter, and plug in the red probe to socket with the Ω notation.  **In practice, start with the highest resistance range and switch down until the measured resistance value is in range: Put one probe on the bottom of the bulb, and the other on the shell of the bulb.  Note the measured resistance value once it settles down.

IMG_0203ce

My bulb, which came from a 6V lantern-battery flashlight, measured about 2.4 Ω.  Yours might be different, but as long as you note the value, it’ll be ok.

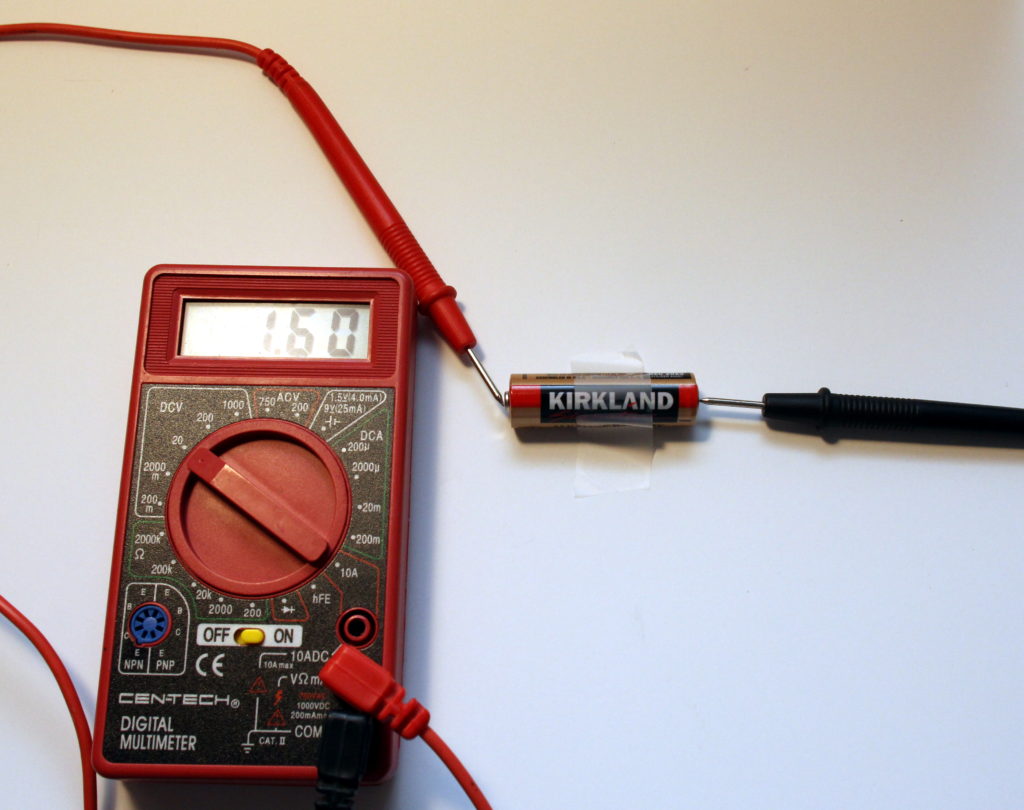
Now measure the voltage of your AA battery.  Put your Multimeter in DC Volts mode.  Make sure black probe is plugged into COM and red probe plugged into the socket with the “V” label.  Since we know the battery will be around 1.5V, go ahead and select the closet voltage range on your multimeter.  To keep the math simple for now, use the smallest range on the dial without the “m” notation (for millivolts) that is at least more than 1.5V.

IMG_0204ce

My battery measured 1.60 V.  A fresh battery usually measures around 1.6V.  Note what yours measures.

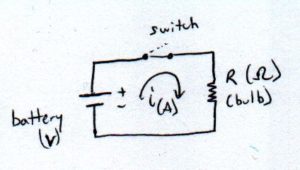
A non-LED, filament flashlight has the following circuit:

sch

  • The voltage source is the battery (batteries)
  • The resistance is the filament light bulb.
  • The current is what flows through the wire from the battery, through the bulb, and back into the battery.

With our measured battery voltage and our measured resistance of the flashlight bulb, we can plug-and-chug into Ohm’s Law and calculate the expected current of the flashlight circuit.

V=IR, solve for I:

I = (V / R), or (1.60V / 2.4 Ω) = 0.67 A

We can measure the actual current of our flashlight circuit by using our multimeter in current mode.

Recall from above that current is the flow of energy.  Unlike measuring Voltage and Resistance where we measure in parallel with the multimeter, to measure current the multimeter has to be in-line with the circuit, because the current has to flow through the meter to measure it.

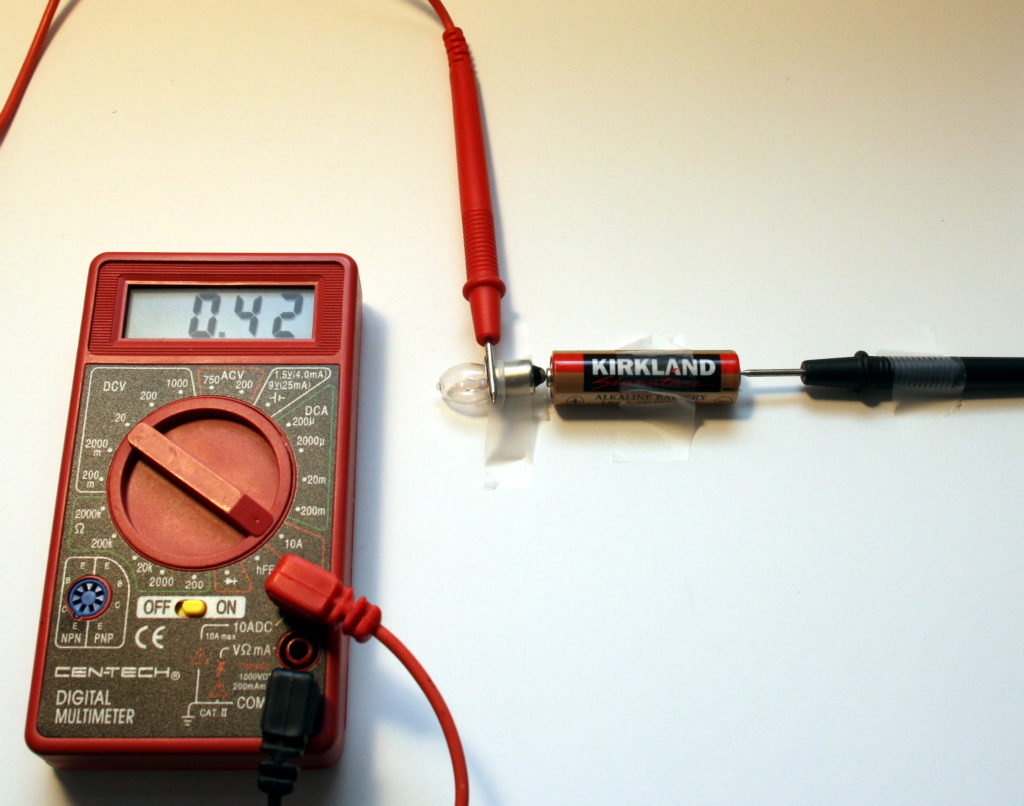
Set the dial on your multimeter to current mode (“A”).  If there is a choice between “A”, “mA”, and “uA”, select “A”.  Plug the red probe to the “A” labeled socket, and plug the black probe to “COM”.  Connect the (+) of the battery to the bottom of the light bulb.  Hold the red probe to the outer shell of the bulb, and the black probe to the (-) of the battery, thereby completing the circuit with the multimeter in-line.  Note the measured current in Amps (A).

IMG_0205ce

My circuit measured 0.42 A.  Close enough.  The resistance of the bulb probably changes as its on and heats up, and we measured its resistance when it was “off”.  So as long as your measured vs. calculated is within an order of magnitude of each other, we’ll say it’s a success.

Given that: if we want to go off of the actual measured voltage and actual measured current from the circuit in operation, we can go back to Ohm’s law and calculate the resistance of the bulb as it operates in the circuit.

R = (V/I), or (1.60V / 0.42 A)  =  3.8 Ω

Application:
Consider your measured current, and assume the bulb resistance (once it lights up) stays the same (you can either use your measured or back-calculated resistance value).  Let’s suggest you double the voltage source by using another AA battery. What would you expect the current to be relative to current from using 1 AA battery?  (higher, lower, same?)

Calculate out an expected value, and measure the actual current of your flashlight circuit with 2 AA batteries powering the bulb.  –Repeat the circuit above, but with the second battery’s (+) placed to the (-) of the first battery, and close the circuit with the multimeter in current mode with the red probe on the bulb shell, and the black probe on the (-) of the second battery.

Again, keep in mind that the bulb resistance will likely change with different supplied voltage.  So look for approximate relative difference in current using one battery vs two.

All things considered, ideally I would have written this “lab” to use an actual resistor, but that might keep a lot of readers away from actually trying it out.  Finding or obtaining a flashlight bulb to almost represent a resistive load is likely a much easier task than obtaining a 100 Ω through-hole resistor component to someone who didn’t know what a resistor is prior to reading this page.  Unfortunately not everyone lives close enough to a Fry’s and Radio Shack is no longer an assumed neighborhood staple.

Further Reading:

  1. https://en.wikipedia.org/wiki/Ohm%27s_law
  2. https://en.wikipedia.org/wiki/Voltage
  3. https://en.wikipedia.org/wiki/Electric_current
  4. https://en.wikipedia.org/wiki/Electrical_resistance_and_conductance
  5. https://en.wikipedia.org/wiki/Resistor