Is your shop’s email address promoting your brand, or someone else’s?

Is your shop’s email address promoting your brand, or someone else’s?

Online web presence is a requiem for practically every business big and small. Dutifully, that includes establishing a proper web site and appropriate domain name to represent the business.

Oftentimes however, I observe small businesses such as favorite mom & pop dining establishments, or real estate agents, go through the effort of setting up [business_name].com for a web site address, only then to use an email address such as [business_name]@[POPULAR_FREE_EMAIL].com

It certainly works, but definitely could be better. –Potentially worse for professional image if the email goes to an uhm “legacy” internet service provider host. It would be great to setup contact email addresses to use the same domain name. Fortunately, it’s not too hard to accomplish, without having to run your own email server or migrate your existing email accounts.

What you’re going to look for is “Email Forwarding” or “Email Alias.” Once setup, what this will do is the domain will receive any emails addressed to “name@example.com” and forward it to whichever email address destination you’ve set. So even if you use Gmail, Yahoo, Hotmail, or AOL email, you can print your business cards and other promotional materials with an @your_business_name.com email address.

Where to find this setting will depend on your current configuration.

a) If you contracted with a consultant to manage your online presence and have a turnkey service agreement with them, by all means contact and let them know you want an email address at your domain to forward to your usual email address. You can still continue reading below as reference to what your consultant might do.

If you’re managing things partially or fully on your own, then either of these will likely apply:

b) Your domain is setup with a registrar and it points an IP address to a server hosted with another provider – chances are you’re using your registrar’s default DNS server. Somewhere within your host-records configuration there should be an option for Email Forwarding or Alias. If you’re unsure, look through the registrar’s support knowledge base or contact the support team

c) If you go into your registrar’s domain setup and you don’t see these DNS options, your domain might be setup to use a non-default nameserver. This may be the case if you’re using the same company for domain and hosting where they have you setup with their “web hosting nameserver”. If the web hosting side presented you a cPanel control panel, you might find the email configuration there.

So far, you can receive emails addressed at your forwarding alias.

No matter what, if you’re writing emails from your Gmail/Yahoo/et.al account, the email headers will show that it is originating from Gmail/Yahoo/et. al.

However, you can set your email account’s “Reply-To” address to your domain forwarding email address. This way, when someone replies to an email, your ‘name@your_business_name.com address will be in the “To:” field. In Gmail, its under Settings->Accounts and Import.

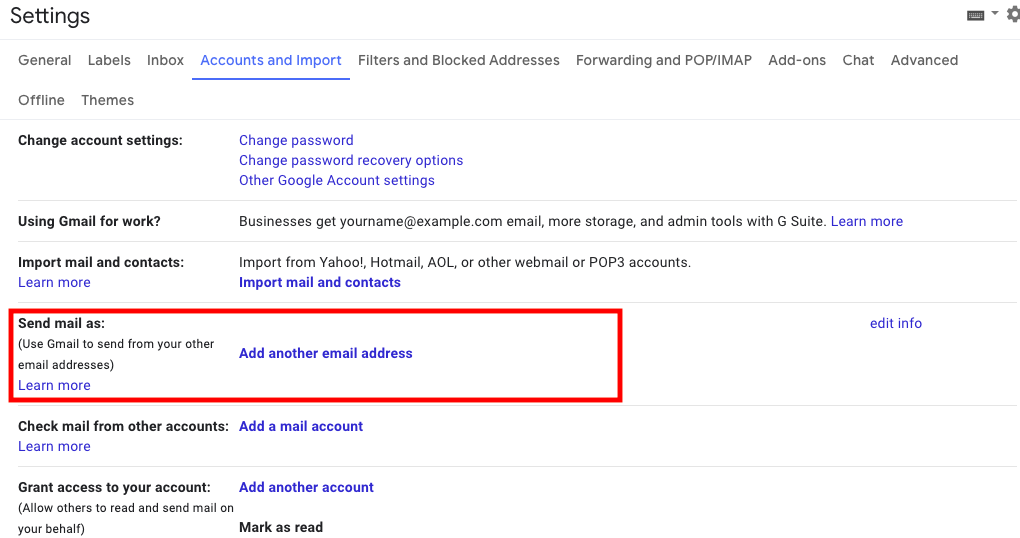
Now, when you go to draft emails, you should get a drop-down option in the “From:” field.


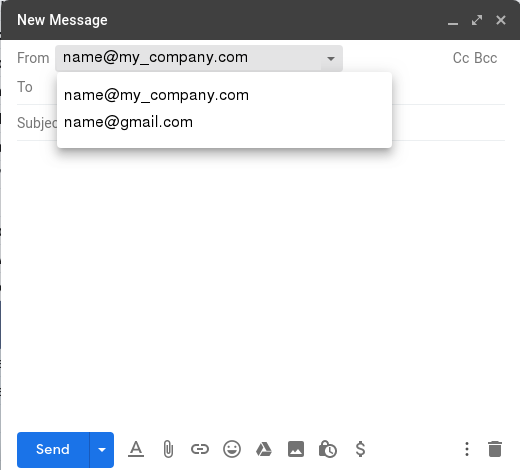
Send some test emails between yourself, maybe get a friend to test it out for you as well to make sure all works as expected. Now you can have consistency with your web address and email address.

New to full-time remote work? Mind these two words.

New to full-time remote work? Mind these two words.

If you’re reading this in March of 2020, you might be working remotely if your type of work permits such work arrangement. Generally the “work from home” conjurers up the image of sitting in bed, on the living room sofa, or at the kitchen counter. For those who work from home on an incidental basis (say, just to care for family illness), opening up the laptop and punching away at the dining table between clearing the dishes is passable for the limited time.

For remote work on a regular basis, it is in your and your productivity’s interest to setup a dedicated workspace.

While nice, a spare bedroom turned into a home office is not necessary. And even so, it’s not the bulletproof distraction-free environment as Professor Robert Kelly can confirm. Just a place that you can set aside for ‘exclusive work use’ is sufficient if it can contain the tools and instruments you need for being online, and that space can be left alone when not working.

Generally a proper desk or an available table positioned at a slightly less trafficked part of the residence will do. (The mahogany table in the dining room that’s only used on Thanksgiving and Christmas would qualify). Adding a low bookshelf can add a virtual wall to enclose an otherwise open space if necessary.

Photo by Kari Shea on Unsplash

The two immediate benefits of a dedicated workspace is

  1. It presents an opportunity for physical separation when working/not-working.
  2. The bench setup is not shuffled around due to other normal home events such as meal times.

The physical separation is important as its really easy to be distracted from work, or not fully unplugging after quitting time. In addition, you being in the dedicated workspace signals others in the home that “you’re at work”.

Often is the case that work projects don’t finish at end-of-business-day and continue the next work day. While you’ll prudently power-off instruments and stow away potentially hazardous items while off of work, the dedicated workspace saves you from daily full setup and tear-down so you don’t have to start every morning unpacking the office station.

If you’d like some ideas: here’s my current battle station, which happens to be in a corner of an otherwise unused guest bedroom:

It’s not always this tidy…

–As you can guess from the nature of this site, my work involves (small) electronics, firmware, and software.

If you’re tight on space, or just need more room, you might consider a closet office such as my other setup when I used to run two stations.

Adoption and office-culture acceptance of remote work has historically varied but trended upwards in past years. Recent global events have pushed the remote work arrangement to the forefront, and various research has indicated mutual benefits for companies and staff.

As working remotely is now in the spotlight, lets join together show the world that as the sh!t. hits the fan, we can still get sh!t done!

For more tips on successfully working from home, check out:


Getting Python to Play the Piano

Getting Python to Play the Piano

Disclaimer: As an Amazon Associate I earn from qualifying purchases

During a recent visit to Costco, the kids and I walked past the KAWAI pianos on roadshow display. We were admiring one of the models that was fully acoustic on the instrument side, but had some embedded electronics and firmware that automated music playing by mechanically actuating the keys.

The nice sales gentleman made his pitch that it’s value in entertaining without requiring an actual piano player. The model on display was $18,999. Considering that I look like a broke college kid most days and our cart contained other low-cost items, I’m hoping the sales gent was being somewhat joking in a deadpan manner and not expecting us to actually place an order on the spot. Plus, I had earlier remarked to my daughter that the price of the piano was just as much as my daily driver sedan.

But it got me to recall that our more modest digital piano is equipped with a USB (USB to Host) port. I was able to confirm after quick documentation review that the USB port presents itself as a MIDI device. I found a USB A/B cable and attached it to the nearby Linux laptop. The OS detected it just fine without requiring any additional drivers or manual kernel module loading.

To anyone at Yamaha reading this, THANK YOU for building devices with standard interfaces without requiring proprietary software or connectivity hardware. For that, you rock.

I spent the next few days downloading MIDI files of various popular music arranged by random folks, and piped them to the piano for play-by-instrument using Rosegarden, which is a music composing and editing program. How well a song performs depends on the arrangement, and the nature of the song’s genre contributes as well. (popular 90s era Latin Pop/Dance sound amazing)

For those unfamiliar: compared to a sound file (.wav) that contains a pulse-code sequence to represent a audio signal, a MIDI file is essentially a sequence of instructions to command an instrument device (physical, or software emulation) to play notes/sounds with prescribed voice and other parameters as well as set instrument controls.

But in my quest for semi-unattended playback, I wanted something that I could just load a playlist and go. I didn’t find such a program, so I went ahead and drafted up a Python script.

The relatively basic script scans the directory for MIDI files into an array, randomly sorts the array, and then calls ‘aplaymidi’ program that comes with Linux with the MIDI port number and file name to play. It features some filename character escaping and very little robust error case handling. But it does catch CTRL+C to gracefully (as best it can) quit out of the loop.

The script runs on the laptop as expected. But because it’s Linux + Python, it also runs on a Raspberry Pi.

I had a moment of pause wondering if the plug-and-play would indeed work on the Pi since it’s ARM based vs. x86/x64, but it was for not because it detected just fine.

Here’s the script running on the Pi, invoked from an SSH terminal shell, since I’m running the pi headless (no monitor or keyboard/mouse attached)

It is truly amazing that I can attach a $35 computer and “upgrade” a lower cost instrument with feature(s) found on models costing hundreds or thousands more!

With the GPIO pins on the RPi, I could certainly attach some hardware buttons and handle events for Play/Stop, FF, and Prev. –For another time, or I’ll leave it as an exercise for you the reader.

Addendum: As with most software projects, the same objective could have been accomplished with other solutions (in this case: shell script, perl, etc) but 1) I wanted to expand my python-fu, and 2) Python is the cool language/tool of this writing. Not that I’d universally suggest everyone to chase every fad and trend, it does help to keep up with available options and general marketshare. If given the chance to work on a lower risk project, I do encourage you to try out and evaluate new or new-to-you tools to solve the problem rather than always using your go-to choices.

Bluetooth Low Energy STM32WB55 Eval Kit Unboxing

Bluetooth Low Energy STM32WB55 Eval Kit Unboxing

I’ve been working on a Bluetooth Low Energy (BLE) based project for the past year, using the Nordic nRF52 integrated SoC. Its powered by a 64MHz ARM Cortex M4 core and Nordic provides good software stack and SDK support.

In keeping up with current industry developments, I was excited to hear about a month ago that STMicroelectronics announced their BLE SoC kit: the STM32WB.

I’ve also worked with ST microcontrollers for the past several years, and they also provide good chip level driver library support. The eye-catcher on their BLE chip is that it’s a dual-core design: A 64MHz ARM Cortex M4 to run the application, paired with a 32MHz Cortex M0+ core to run the wireless stack.

After a few weeks of scoping limited inventory, I was able to score an Eval kit:

One of the nice options in working with ARM microcontrollers is that we’re spoiled for choice on IDE options. The Free option is the one I featured today: GNU MCU Eclipse. It is a bit of a setup/install process, but the guide is pretty straightforward and it gets you a $0 development environment that is not feature or code-size limited.

Professional lessons we can learn from Plushies

Professional lessons we can learn from Plushies

In the toy chest realm, there are many job roles and responsibilities that are assigned to different toys, or kinds of toys. The levels of “skills” and “how equipped” each toy has to perform its duties varies. All not too dissimilar to career professionals.

Take LEGO building blocks for example. They are tasked to encourage imagination, problem solving, and physical dexterity. The molded plastic structures are well designed for reliable and repeatable inter-connectivity. By nature of mechanical design, LEGO blocks are well suited for harsh environments that subject heat (hot car), water (bath tubs, sinks), and physical stress (don’t try stepping on one!).

Many other kinds of toys follow the same job roles and in-built traits that help fulfull those responsibilities: die cast cars, Lincoln Logs, Mr. Potato Head, etc.

Then we come to the stuffed toys, or plushies. Honestly the world of plushies could be discussed as one of their own, but for now let’s just simplify the genre as a general group.

When a kid is given (or finds) a plushie, a job assigned to that plushie is to encourage imagination. But it’s also assigned a role of emotional and morale support. Or maybe its assigned a static decorative item to spend most of its days safe on a shelf. A lot of it comes down to the client (the child).

That plushie might have to “work” long hours and be on-call at nights. Or defend as night watch and doze during the day. It may be carried along everywhere and possibly left anywhere.

The design and equipping of plushies somewhat contractracts itself. Most are fabricated with soft materials to appeal to senses, but the porous, absorbent fabrics don’t stand a chance against unwanted interactions with liquid substances. Soft feely materials don’t hold up well against rigorous cleaning cycles, so wear and tear is very present and observable.

Despite those head winds, plushes fulfill their duties very well. They are loved well by their owners. And they become “well loved”. Like “Pur-See” in my own home:

My daughter’s unicorn plush. It came with its own carrying purse, hence the name “Pur-See”

Which brings up one other important design and equipping detail on plushes: they are very prone to damage. A loved but soiled plush requires a gentle cleaning approach because while a plush can be physically replaced, its “not the same”.

What can we learn from plushes:

  • Core competencies do not fully detail someone’s ability to deliver.
  • A person’s capability to fulfill responsibilities are not limited to the equipping and skill-set present when they start the job.
  • Unexpected challenges on project objectives are best met with systematic strategies and due diligence to arrive to most appropriate corrective actions provided the circumstances and risk assessment/mitigation.
  • While you can always look for another (developer, engineer, analyst, assistant, <job role> ) to fill a vacant position, you know it won’t be the same as working with Jeff, Jennifer, or Justin.
    • On the flip side, you can build in redundancy by cross-training your team members, keeping contact with dependable people in your network, and being ready to bring in additional help. After recently surviving an uhm… incident, “Pur-see” will soon have a twin sister and cousin.
A robot car kit to satisfy curiosity

A robot car kit to satisfy curiosity

Disclaimer: As an Amazon Associate I earn from qualifying purchases.

Ever since our little ones got hooked on watching NASA/JPL Curiosity landing videos, they’ve developed a strong interest in robotics (yay!!!).

And as luck would have it, our kids would often ask me (the dad) to “build a robot”.  When the kids were younger, building models with LEGO would suffice.  But it soon became apparent they wanted a “real” machine.  I had given a design try a while back.  I spent a few evenings looking up design ideas, drafting up sketches of mechanical pieces that we could fab from hobby plywood… but never got further from the computer screen.

Historically, I haven’t been a huge fan of turnkey kits.  I had saw them to be either of low quality or charged a significant premium for the convenience of all pre-selected parts in one box.

But then I found this Elegoo Smart Robot Car Kit.

The kit comes with an Arduino control board, an I/O board, a ultrasonic module, a bluetooth module, line following module, motors, wheels, chassis, and all hardware needed for assembling the kit.

My Value Justification:

At time of writing, this off-the-shelf kit will get to your door at a reasonable packaged price.  You can easily spend half that cost just on machining the chassis plates yourself.  You could alternatively individually purchase a standard Arduino board, and other modules, but you’d still have to figure how to mechanically and electrically link them together.  The board designs may be open source and be a good EDA design exercise, but good luck getting the PCBs made for < $100 before you even add in the parts BOM.

The Build:

It went really well.  The kit came with clear illustrated instructions which our 2nd grader and Kindergartner were able to follow along with just a little hand dexterity help from me for some of the tighter screw assemblies and finer connections.

Parts quality is good.  The pieces appear to be machined well.  The components and hardware aligned up very easily with little fuss.

The kids now have a robot:

The kit includes demo and learning firmware projects to load via the Arduino IDE.  We are able to upload the “auto_go” firmware to the kit and watch the car drive around on the floor.

I’m quite impressed at this kit, what it comes with, and what it enables.  The car robot as-kitted presents many learning applications, but it also lends itself to expansion and modding.

In terms of inspiring learning pursuits, robotics engages the young hungry minds in mechanical engineering, electronics design, embedded firmware development, and applications development.

Introducing Computer Science with micro:bIt

Introducing Computer Science with micro:bIt

Disclaimer: As an Amazon Associate I earn from qualifying purchases

Throughout the school year we introduce computer science concepts as appropriate for age and skill level.  Towards the end of last school year we started using the micro:bit platform as a fun learning tool with much success and plan to continue in the following weeks.

The micro:bit is a plug-and-go easy to use introductory electronics and programming platform with a 5×5 LED “display” matrix, a couple buttons, and a 3-axis accelerometer.

The kit comes with a battery pack and a short micro-USB cable for power/programming.  The longer hi-visibility red cable that I used is this one: https://amzn.to/2KQv6Wm

The programming environment is web based, so any computer with a modern browser and an available USB port should work.  Our kids were able to do the labs with our relatively low-power, long battery life Chromebook

Time-Lapse capture with webcam and Linux scripting.

Time-Lapse capture with webcam and Linux scripting.

Disclaimer: As an Amazon Associate I earn from qualifying purchases.

Time-lapse photography is a concept of taking snapshots at a particular interval over time to record events in a low resource manner, compared to capturing a video stream.  Here, we discuss how to use a relatively inexpensive web camera and a computer to build a low-budget time-lapse platform.

Action Summary

Video capture of a video capture

Pretty much any relatively modern PC with decent storage and functional USB 2.0 ports should suffice.  I had an old big-box special on hand.

Logitech webcams tend to plug-and-play easily with Linux distros:

The Logitech C615 is the model featured.  It does 1080p capture, with some nudging.

*Even though I held up an external HDD in the footage, I didn’t get to show setting that up yet and instead relying on internal storage for now.

The “cheese” program is a quick way to test a webcam. (https://help.gnome.org/users/cheese/stable/introduction.html.en).  To install on a Ubuntu/Mint system, use apt-get in a terminal window:

sudo apt-get install cheese

A Compact Flexible Tripod makes for camera positioning in tight corners.

We looked at how to use the fswebcam Command Line utility to capture images via the terminal.  You may either git clone from the project page, or on an Ubuntu/Mint system, enter in a terminal window:

sudo apt-get install fswebcam

It is a bit of trial-and-error figuring the optimal parameters for the fswebcam utility with a camera.

Then we watched how bad I am at live shell scripting, though I freely admit its not my everyday gig and that I make liberal use of internet search the few times I write shell scripts.  Can’t go wrong with an O’Reilly book on Shell Scripting if you want an at arms reach reference to thumb through

Hope you found this useful and informative.  Having a setup like this opens up a lot of other potential applications to build upon.

Disclaimer: from a technical and functional perspective, this post is about using extending usage of commodity hardware using computer scripting.  There are some potential premise security applications for such a setup.  While anyone is welcome to use the information herein, the reader is responsible for determine appropriate for use, deployment, and maintenance of such applications for their security needs.  I/We do not explicitly endorse this type of setup as a part of a security protocol.

On teaching ingenuity

On teaching ingenuity

A bit of a departure from the usual electronics/software based post, but a writing about learning nonetheless.

This week wrapped out the school year for us and our kids.  Our kindergartner had quite the gainful first year of “official” school.  Rather than trying to finish up our science study on The Brain and The Senses, we instead built solar ovens as the last lesson.  They’re always the next year to pick back up where we left off.

The “lab instructions” that I put together in <15 minutes the night before basically called out materials including a box, black construction paper, plastic food wrap, and aluminum foil and directions on assembly.  Following was a basic “what do you expect” and “what happens” fill-in when shining the sunlight into the “oven”.

It was ~77F outside in the sun.  The oven’s interior temp got up to near 100F within minutes, not bad for no consideration of insulation or other potential optimizations.  The kids were quite impressed that the cheese started melting.  They also couldn’t wait until next day to “toast” marshmallows.

The casual conversations into the evening afterwards was vindication that it was worthwhile to do this really, really basic experiment.  –The same experiment I read and followed along years ago IIRC from a Fox Kids Club magazine..yes I’m dating myself here.

AJ started scheming up other ways to make “ovens”, after understanding how the one he just built conceptually operates.  One of his ideas for another “solar” oven was using a light bulb, which I had to nudge that it wouldn’t be a direct solar design as it would need electricity.  It is interesting that he mentioned using a light bulb: it must be intuitive that bulbs generate heat, so much so that there used to be a commercially available toy built on that premise.  However, in his short years of life he’s probably only ever seen CFL and LED bulbs in use, as incandescents have fallen out of favor due to higher energy usage, working against the A/C trying to keep the rooms cool.


This kind of creativity and ingenuity isn’t necessarily a directly teachable thing, but kinda builds from within from exposure and otherwise nurturing experience.  Its such an important trait that we impart on our future leaders and innovators that we can’t lose sight of.  But I sometimes think in our (the parents and educators) quests of trying to get our kids to eventually learn the most advanced skills they can absorb in their young learning years, its quite easy for ingenuity to fall out the wayside.


STEM is a big catchy thing these days for various reasons, and if/when done correctly I believe the attention can yield great results that everyone will appreciate.  When discussions turn quickly into action plans like putting every kid starting from pre-k in front of a computer with a software IDE, maybe we should step back and consider its not all “what” they’re learning, but “how” and “why” counts as well.


And with that, SCHOOL’S OUT …FOR SUMMER!  Maybe I’ll have a few spare moments to finally build out more of the Embedded Systems 101 workshop.


Flowcharts – the beginning, end, and a decision.

Flowcharts – the beginning, end, and a decision.

In software design and documentation, flowcharts are drawn to draft out algorithmic flow.  Generally this is done sometime before writing out any code to set an initial plan, but sometimes not.  More often in practical applications, flowcharts make their way into design specifications documents that outline how the software was well, designed.

A flow chart can be summarized as an illustration of a process with decisions and activities to be performed based on those decisions.

A flow chart, typically starts with a “start” terminal.

A flow is indicated by an arrow.  Arrows connect blocks together in a flow diagram

A decision to be made is written inside a diamond:

The condition for the decision is written inside the diamond.

An arrow will go into the decision diamond from the top, and branch off to the sides depending on whether result is TRUE or FALSE.

An action is written inside a rectangle

And finally, a process or flowchart ends with an “end” terminal.

To review our mini-lesson, let’s do a LAB 1: Let’s follow a Process”.

Materials needed.

  • Counting Blocks.  –I originally wrote this for schooling where we have lots of nice manipulatives, which is just fancy multi-sensory speak for things that you can count with.  Whatever physical or mental objects you can count with will suffice.

Let’s read the following process:


  1. Follow the process with 2 counting blocks.  What action did you do?
  2. Follow the process with 3 counting blocks. What action did you do?
  3. Follow the process with 4 counting blocks. What action did you do?


Further Reading